Unlock the Secret to a Truly Juicy Holiday Turkey with an Easy Brine
Thanksgiving is a time for gratitude, family, and, of course, a show-stopping turkey. Yet, for many home cooks, the thought of a dry, bland bird looms large. What if we told you there's a simple, almost foolproof method to guarantee a moist, flavorful centerpiece every single time, even if you accidentally overcook it? Enter the magic of a good **turkey brine recipe**. This straightforward technique is your secret weapon for transforming an ordinary holiday roast into an extraordinary culinary experience. Brining isn't just for professional chefs; it's an accessible step that delivers incredible results, making it an essential part of your holiday prep. It’s truly your Thanksgiving insurance policy, ensuring that even if dinner preparations get a little hectic, your turkey will still be succulent and delicious.What Exactly Is Turkey Brining and Why Does It Matter So Much?
At its core, brining is simply submerging your turkey in a salt water solution for a period before roasting. This "spa treatment" for your bird works wonders in two key ways:- Moisture Retention: Through osmosis, the turkey meat absorbs some of the brining solution. More importantly, the salt in the brine causes some of the proteins in the turkey's muscle fibers to unravel or "denature." This change allows the muscle fibers to hold onto moisture more effectively during the high heat of roasting, preventing them from seizing up and squeezing out precious juices. The result? A remarkably moist turkey, from breast to thigh.
- Flavor Infusion: Beyond just salt, a good **turkey brine recipe** offers a fantastic opportunity to infuse your bird with layers of aromatic flavor. Herbs, spices, citrus, and even sweeteners can penetrate the meat, enhancing its natural taste and adding a festive bouquet that will have your kitchen smelling incredible. While the deepest impact on flavor comes from the salt, these aromatic additions make a noticeable difference, especially on the skin and outer layers of the meat.
Essential Tips Before You Dive into Your Turkey Brine Recipe
Before you grab your salt and water, there are a few crucial considerations to ensure your brining process is safe and successful.Check Your Turkey's Label: The "Pre-Brined" Alert
This is perhaps the most critical step. Many commercially sold turkeys, especially those labeled "kosher," "enhanced," or "self-basting," have already been treated with a saline solution. Brining an already brined turkey will result in an excessively salty bird that's practically inedible. Always check the packaging carefully. If it lists salt, broth, or any "enhanced" solution, skip the brine. Organic or heritage turkeys are typically untreated and ideal candidates for your homemade brine.
Thawing Considerations: Partially Frozen is Perfectly Fine
Don't fret if your turkey isn't completely thawed when you're ready to brine. A partially frozen turkey can safely continue to thaw within the cold brine solution in your refrigerator. Just ensure it's fully submerged and the internal temperature of the brine and turkey remains consistently below 40°F (4°C).
Space & Container Management: Plan Ahead!
Brining a turkey requires significant space. A large turkey in a brine solution can be surprisingly bulky. Clear out a shelf in your refrigerator or consider using a dedicated brining bag set inside a large stockpot, a clean cooler (packed with ice to maintain safe temperatures), or a food-grade bucket. Disposable brining bags are a fantastic, space-saving option that can often fit into a crisper drawer or a cooler. Make sure whatever container you use is food-safe and leak-proof!
Hygiene and Food Safety: Non-Negotiable
Working with raw poultry demands strict adherence to food safety. Always wash your hands thoroughly with soap and warm water before and after handling the turkey and brining solution. Sanitize all surfaces, utensils, and containers that come into contact with the raw bird or brine. Never reuse brine; once the turkey is removed, the solution should be discarded.
Crafting Your Perfect Easy Turkey Brine Recipe: The Core Components
The beauty of an **easy turkey brine recipe** lies in its simplicity, but the real magic comes from customizing it to your taste.The Basic Ratio: Salt and Water
The fundamental building block of any wet brine is salt and water. A widely accepted ratio that works beautifully for most turkeys is:
- 1 cup of kosher salt per 4 quarts (1 gallon) of water.
Why kosher salt? Its larger crystal size dissolves easily and provides a consistent salinity without the metallic taste often associated with iodized table salt. Avoid using table salt as it can make your brine too salty due to its finer grain and higher density per cup.
Infusing Flavor: Beyond the Basics for a Festive Roast
While the salt does most of the heavy lifting for moisture, the aromatics are what truly elevate your turkey to a holiday masterpiece. Think of these as your palette for deliciousness:
- Classic Herbs: Fresh sage, rosemary, and thyme sprigs are quintessential Thanksgiving flavors. Their earthy, fragrant notes permeate the skin and subtly flavor the meat. Bay leaves also add a lovely, subtle background note.
- Bright Citrus: Halved oranges, lemons, or even tangerines add a wonderful acidity and freshness that brightens the overall flavor profile. The zest and juice both contribute.
- Aromatics & Spices: Whole peppercorns, smashed garlic cloves, and quartered onions add depth and pungency. For an extra layer of flavor, consider adding a teaspoon or two of whole coriander seeds, juniper berries, or star anise. A pro tip: Lightly toasting whole spices in a dry pan before adding them to the brine can intensify their aromatic oils.
- Sweetness (Optional): A touch of brown sugar, maple syrup, or apple cider can help balance the saltiness and contribute to beautifully browned, caramelized skin.
This allows you to create a truly unique and memorable **turkey brine recipe** tailored to your family's preferences. For more advanced tips and to further Unlock Juicy Flavor: Your Easy Guide to Perfect Turkey Brine, explore variations in aromatics and techniques.
Step-by-Step Guide: How to Make and Use Your Easy Turkey Brine
Now that you understand the "why" and "what," let's get to the "how." This straightforward process will have you well on your way to a perfectly juicy bird.1. Preparing the Brine Solution: The Safe Way
- Combine & Heat: In a large stockpot, combine 1 quart of your total water with the kosher salt, any sugar, and your chosen hardier aromatics (like whole spices, citrus halves, garlic, and onion). Bring this mixture to a boil over high heat, stirring until the salt and sugar are completely dissolved. This step helps extract the maximum flavor from your aromatics.
- Cool Down: Remove the pot from the heat. Add the remaining 3 quarts of cold water to the concentrated brine. This rapidly cools the mixture down. You want the brine to be at room temperature or even slightly lukewarm – absolutely not hot – before introducing it to the turkey. If the brine is too hot, it will start to cook the turkey, which is undesirable. You can even add a few cups of ice to speed up the cooling process if needed, just ensure it fully melts before proceeding.
- Add Delicate Herbs: Once the brine has cooled, stir in any fresh, delicate herbs like sage, rosemary, or thyme sprigs.
2. Brining Your Turkey: The Submersion Method
- Prepare the Turkey: Remove the turkey from its packaging, discard the giblets and neck from the cavity (save them for gravy if desired), and pat the turkey dry with paper towels.
- Submerge: Place the turkey in your chosen brining container (brining bag, large pot, or cooler). Carefully pour the cooled brine solution over the turkey, ensuring it is completely submerged. If parts of the turkey float, you can weigh it down with a plate or a clean, heavy object.
- Refrigerate: Cover your container or seal the brining bag. Place the turkey in the refrigerator (or a cooler packed with ice, maintaining temperatures below 40°F/4°C) for 12 to 24 hours. A good rule of thumb is about 1 hour per pound of turkey for a full flavor infusion, but never exceed 24 hours, as the turkey can become too salty or develop a cured texture.
3. Post-Brining Care: Ready for Roasting!
- Remove & Discard: After the brining time, carefully remove the turkey from the solution. Discard all the brine; it's done its job and cannot be reused.
- Rinse (Optional, but Recommended): For a less salty exterior, you can give the turkey a quick, light rinse under cold running water. Be mindful to minimize splashing to avoid cross-contamination in your sink.
- Pat Dry, *Very Dry*: This step is crucial for crispy skin! Use plenty of paper towels to pat the entire surface of the turkey, inside and out, as dry as possible. You can even let it air-dry in the refrigerator for a few hours after patting it dry for an even crispier skin.
- No Extra Salt: Remember, your turkey has absorbed plenty of salt during the brining process. Do NOT add any extra salt to the skin or cavity before roasting. You can, however, rub it with herbs, butter, or oil to promote browning and flavor.
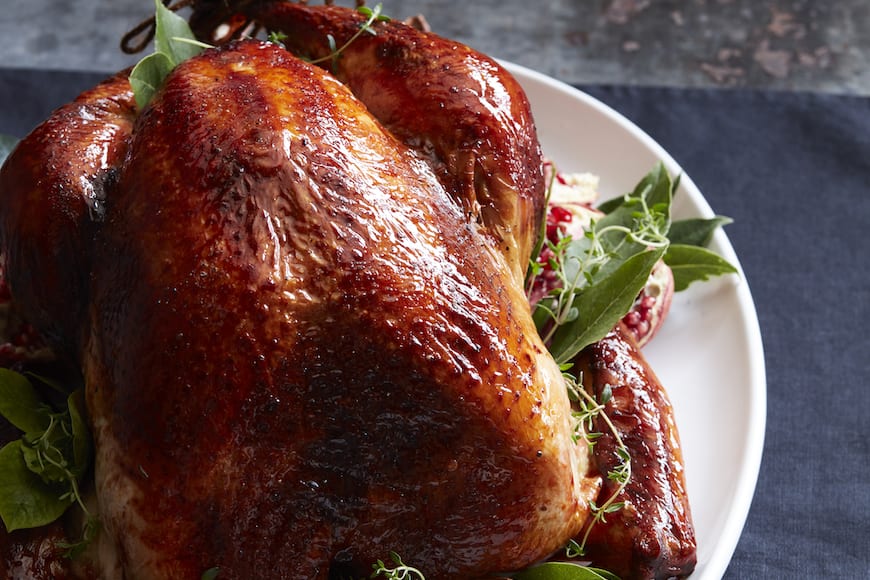
- Roast: Your perfectly brined turkey is now ready for your favorite roasting method! For more comprehensive guidance on achieving that perfect, moist roast, be sure to check out The Foolproof Turkey Brine Secret for Moist, Flavorful Meat.
