Unlock Juicy Flavor: Your Easy Guide to Perfect Turkey Brine
There’s a universal dread that often accompanies the thought of cooking a whole turkey: the fear of a dry, bland bird. But what if we told you there’s a simple, time-tested secret to achieving a remarkably moist, exquisitely flavorful turkey every single time? Enter the magic of a good
turkey brine recipe. Brining isn’t just a culinary technique; it’s an insurance policy for your holiday feast, guaranteeing a succulent centerpiece that will have everyone reaching for seconds.
Many home cooks, myself included, have discovered that once you start brining, there’s no turning back. It transforms a potentially daunting task into a confident stride towards culinary success. Even if you accidentally overcook your turkey slightly, the brine acts as a safeguard, ensuring the meat remains tender and juicy. This guide will walk you through everything you need to know to master the art of brining, from understanding its benefits to crafting your own signature solution. For an even deeper dive into foolproof methods, check out
The Foolproof Turkey Brine Secret for Moist, Flavorful Meat.
What is Brining and Why Is It Your Turkey's Best Friend?
At its core, brining involves submerging your turkey in a saltwater solution for a period before roasting. This "spa treatment," as some call it, works wonders thanks to a process known as osmosis and denaturation. The salt in the brine helps to break down muscle proteins, allowing the turkey cells to absorb more water and flavor. As the turkey roasts, these reconfigured proteins are less likely to seize up and expel moisture, resulting in a bird that stays incredibly moist and tender.
Beyond just moisture, a well-crafted
turkey brine recipe provides an incredible opportunity to infuse your bird with a symphony of flavors. Herbs, spices, aromatics, and even citrus can penetrate the meat, enhancing its natural taste and creating a truly memorable meal. While this article focuses on *wet brining*, where the turkey is submerged in liquid, it’s worth noting there's also *dry brining*. Dry brining involves rubbing the turkey with salt and letting it rest, which also helps tenderize and retain moisture, though the flavor infusion is typically less pronounced compared to a wet brine. Both methods aim for the same delicious outcome: a moist, delicious turkey.
Essential Preparations and Brining Best Practices
Before you even think about mixing your
turkey brine recipe, a few crucial considerations will set you up for success:
*
Check Your Turkey's Label: This is perhaps the most critical step. Many turkeys sold today are "pre-brined," "kosher," "enhanced," or "self-basting." These turkeys have already been injected with a saline solution. Brining an already brined turkey will result in an excessively salty, unpalatable bird. Look for labels that explicitly state "no added solutions" or "all-natural." Organic turkeys are often a safe bet.
*
Make Space in the Fridge: A whole turkey in a brining container takes up significant refrigerator real estate. Plan ahead and clear out a shelf or two. You’ll need a container large enough to fully submerge your turkey without overflow. Options include a large stockpot, a clean food-grade bucket, or even a cooler (more on that later).
*
Consider Brining Bags: Disposable brining bags are a game-changer for many. They are strong, leak-proof, and can often be placed in a crisper drawer or a large roasting pan, saving space and making cleanup easier.
*
Partially Frozen is Fine: Don't panic if your turkey is still a bit icy when it's time to brine. The cold brine solution in the refrigerator will continue to thaw it safely and gradually, ensuring it reaches the proper temperature for roasting.
*
Food Safety First: Always keep your brining turkey at a safe temperature below 40°F (4°C). This means it must be refrigerated for the entire brining duration. If you're using a cooler, ensure it's packed tightly with ice to maintain a consistent cold temperature, and monitor it regularly.
Crafting Your Perfect Turkey Brine Recipe: The Basic Formula
The foundation of any great
turkey brine recipe is a simple, effective ratio of salt to water. This basic mixture provides the osmotic power needed to draw moisture into the bird.
The Core Ratio:
For every 1 gallon (4 quarts) of water, you’ll need 1 cup of kosher salt.
*
Why Kosher Salt? Kosher salt has larger crystals and lacks anti-caking agents found in table salt. This means it dissolves more easily and provides a less aggressively salty taste per volume compared to an equal volume of finer table salt, which is denser. If you *must* use table salt, reduce the amount by half.
*
Adjusting for Turkey Size: This ratio is suitable for a standard 12-15 pound turkey. For larger birds, simply scale up the brine proportionally. You'll need enough brine to completely cover the turkey.
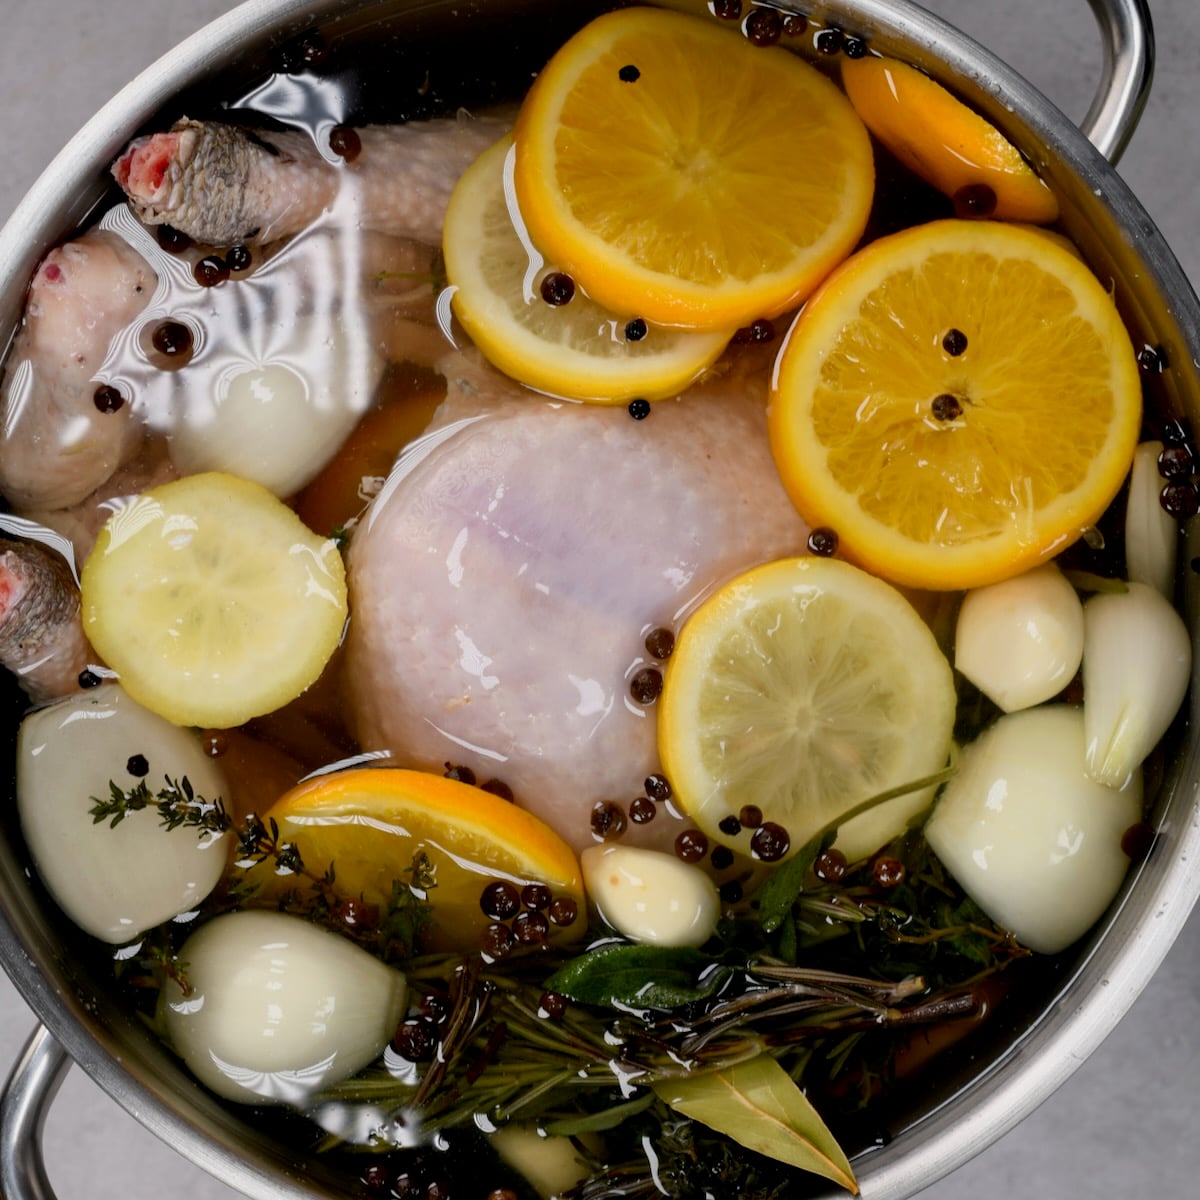
Elevate Your Brine: Flavor Enhancements and Signature Touches
While salt and water are the functional core, the true magic of a memorable
turkey brine recipe comes from the aromatics and seasonings you add. These infuse the turkey with subtle yet distinct flavors, particularly enhancing the skin and superficial meat layers.
*
Herbs: Classic choices like fresh sage, rosemary, and thyme sprigs are fantastic. Their earthy, aromatic notes perfectly complement turkey. Consider adding bay leaves for a deeper, almost sweet complexity.
*
Citrus: Sliced oranges, lemons, or even grapefruit halves bring a bright, zesty dimension that cuts through the richness of the meat. The zest contains potent oils that will perfume your entire kitchen.
*
Spices: Whole black peppercorns, juniper berries, star anise, or coriander seeds can add intriguing layers of flavor. Toasting whole spices briefly before adding them to the brine can intensify their aroma.
*
Aromatics: Halved onions, smashed garlic cloves, and chopped carrots or celery can contribute savory, foundational flavors to the brine, much like they would to a stock.
*
Sweeteners: A touch of brown sugar, maple syrup, or apple cider can help balance the saltiness and promote beautiful browning of the skin during roasting. The sugars caramelize, giving the turkey a lovely color and subtle sweetness.
My personal favorite combination for a festive holiday bird often includes fresh sage, orange slices, bay leaves, whole peppercorns, and a hint of brown sugar. The resulting aroma fills the house and sets the perfect holiday mood. For more inspiring ideas on customizing your holiday roast, explore
Easy Thanksgiving Turkey Brine: Guarantee Juicy Holiday Roasts.
Step-by-Step Guide to Brining Your Turkey
Creating and using your
turkey brine recipe is a straightforward process. Follow these steps for optimal results:
1.
Prepare the Concentrated Brine: In a large stockpot, bring 1 quart (1 liter) of your total water to a boil. Add the full amount of kosher salt, stirring until it's completely dissolved. This hot liquid helps the salt dissolve thoroughly.
2.
Infuse Flavors: Add your chosen herbs, spices, citrus, and other aromatics to the hot saltwater solution. Let it simmer gently for 5-10 minutes to allow the flavors to bloom and infuse into the liquid.
3.
Cool Down: Remove the pot from the heat. Stir in the remaining cold water (e.g., 3 quarts if you started with 1 quart hot). This rapidly cools the brine down to at least room temperature, if not lukewarm. *It is crucial that the brine is completely cool before adding the turkey.* Adding a turkey to warm brine can promote bacterial growth. If necessary, add a few handfuls of ice to speed up the cooling process, ensuring it all melts before the turkey goes in.
4.
Prepare the Turkey: Remove your turkey from its packaging. Remove the neck and giblets from both cavities (reserve for gravy if desired). Rinse the turkey thoroughly inside and out with cold water and pat it dry with paper towels.
5.
Submerge the Turkey: Place the turkey breast-side down (or breast-side up, ensuring it's fully submerged) into your chosen brining container. Pour the cooled brine over the turkey, making sure it is completely submerged. If it's not fully covered, you may need to make a bit more brine or weigh the turkey down with a plate.
6.
Refrigerate: Cover the container and place it in the refrigerator. Brine the turkey for approximately 1 hour per pound, but no more than 24 hours total. A typical 12-15 pound turkey will brine effectively in 12-18 hours. Brining for too long can result in an overly salty or mushy texture.
7.
Post-Brining Prep: Once brining is complete, remove the turkey from the brine. Discard the used brine (do not reuse it). Rinse the turkey thoroughly under cold running water to remove any excess salt from the surface. Pat the turkey *very dry* inside and out with paper towels. This crucial step promotes crispy skin.
8.
Roast: Your turkey is now ready for roasting! Remember, since the turkey has absorbed salt from the brine, you won't need to add any extra salt before cooking. Season with pepper, herbs, or butter as desired, and roast according to your favorite method.
Conclusion
Embracing a well-executed
turkey brine recipe is one of the most impactful steps you can take to elevate your holiday feast or any roasted turkey meal. It’s a simple technique that yields profound results: a turkey that is not only incredibly moist and tender but also deeply infused with layers of aromatic flavor. By understanding the basics, customizing your brine with favorite seasonings, and following proper food safety guidelines, you can confidently prepare a show-stopping bird that will be the highlight of your table. Say goodbye to dry turkey forever and unlock the juicy, flavorful potential of your next roast!